Gero3D App User Manual
Introduction
1.1 Welcome to Gero3D
At Gero3D, we are redefining the way orthopedics approach patient care with our revolutionary technology. Our company has embarked on a mission to transform traditional plaster casts into personalized, 3D-printed solutions. These aren’t just casts; they represent a harmonious blend of individual expression and cutting-edge technology, leading to casts that are lightweight, hygienic, and exceptionally comfortable.
1.2 Purpose of the Gero3D App
The Gero3D app is an integral part of this transformative journey. Designed to bridge the gap between healthcare professionals and innovative casting solutions, our app simplifies the process of creating custom-made casts. With features that allow for detailed scanning of a patient’s extremity, a seamless ordering system, and options for personalization, the app ensures a hassle-free, efficient experience for both orthopedic therapists and patients.
1.3 Empowering Orthopedics with Technology
Our app is more than just a tool; it’s a gateway to enhanced patient care. It provides:
Personalization: Every cast can be tailored to the patient’s unique anatomy and preferences, from size and fit to color and design.
Simplicity and Efficiency: The app’s intuitive interface allows for easy scanning, customization, and ordering, significantly reducing the time and effort involved in cast creation.
Quality and Comfort: The end product is a testament to our commitment to quality – a lightweight, comfortable, and hygienic cast that promotes better skin health and patient satisfaction.
1.4 Navigating the App
In this manual, you will find detailed instructions on how to navigate and utilize the various features of the Gero3D app. From setting up your account to completing an order, each step is designed to be straightforward and user-friendly, ensuring a smooth and effective process for every user.
Welcome to the future of orthopedic care with Gero3D. Let’s embark on this journey together to provide unparalleled care and comfort to patients in need.
Getting Started
2.1 Installation and Setup
Pre-Installed App: The Gero3D app comes pre-installed on the iPad provided to your clinic. This eliminates the need for downloading or installing the app, allowing you to get started immediately.
Device Preparation:
Charging: Ensure that the iPad is fully charged before use. Regular charging helps maintain the device’s readiness for use at any time.
Sensor Connection: The Gero3D app utilizes an external sensor for the scanning process. This sensor needs to be connected to the iPad via the USB Type-C port. A secure connection is crucial for the accurate functioning of the scanning feature.
Initial Power On: Once the iPad is charged and the sensor is connected, power on the iPad. You will find the Gero3D app on the home screen.
App Accessibility: Tap the Gero3D app icon to open it. The user-friendly interface is designed for easy navigation, ensuring a smooth start to your experience.
First-Time Use: If this is your first time using the app, you may be prompted with a brief tutorial or walkthrough. This is an excellent opportunity to familiarize yourself with the app’s features and capabilities (see section 6).
2.2 Account Creation and Login
Initial Account Setup:
During the onboarding process of a new clinic, Gero3D collects the email addresses of all therapists who will be using the app.
We then generate unique passwords for each therapist and send the login details (email and password) directly to their provided email addresses.
Logging into the App:
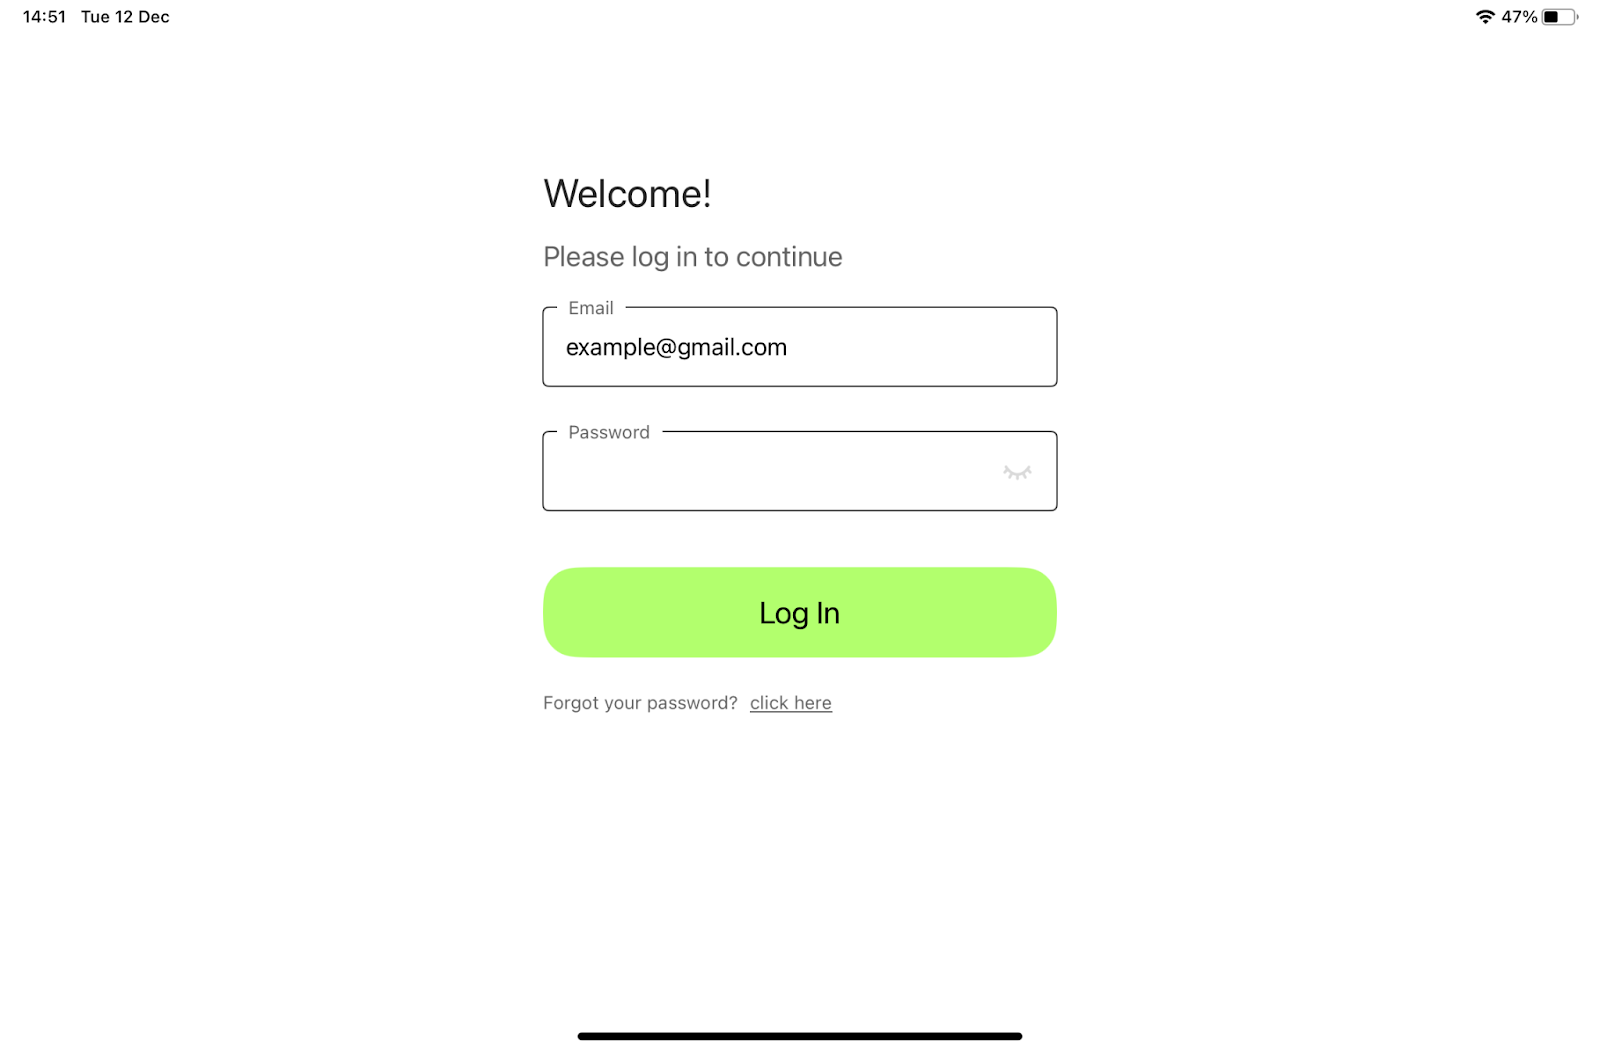
To access the Gero3D app, therapists will use their email and the password provided by Gero3D.
Press the “Log In” button in order to login into the system.
Adding New Users:
If a clinic wishes to add additional therapists to the app, they need to send a request to Gero3D.
This request should be emailed to support@gero3d.com, including the details of the new user(s).
Once the request is processed, Gero3D will create the user account and send the login information to the provided email address of the new user.
Security and Privacy:
We prioritize the security of user information. It is essential that therapists keep their login details confidential to ensure the integrity of patient data and app usage.
Regular Updates:
Clinics and therapists are advised to keep their contact details up-to-date. If there are changes in the therapist’s email or if additional therapists need to be added, please inform us promptly.
By following these procedures, therapists can securely and efficiently access the Gero3D app, ensuring they are ready to provide personalized, high-quality care to their patients using our innovative 3D-printed casts.
Account Management
3.1 Forgot Password Process:
Forgetting a password is a common occurrence, and the Gero3D app has a straightforward process for resetting it. Here’s how therapists can reset their password if they forget it:
Initiating Password Reset:
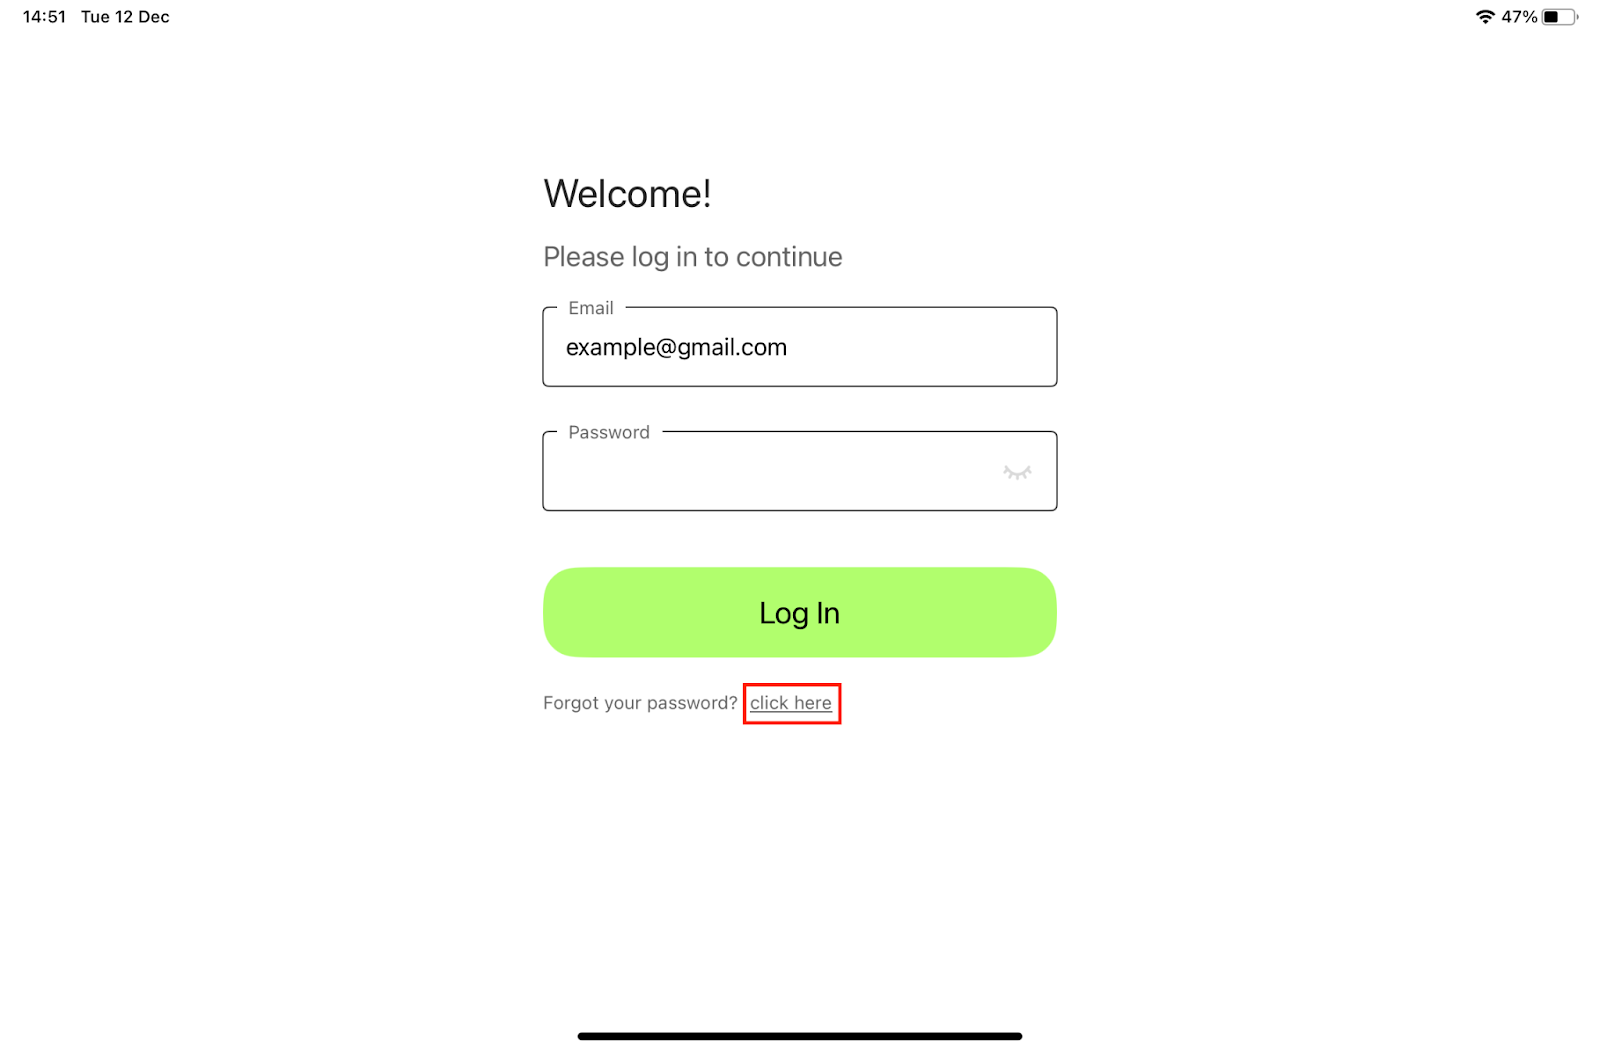
On the login page of the Gero3D app, there is a “Forgot Password” button. Click this button to start the password reset process.
Entering Email Address:
The therapist will be prompted to enter their email address associated with the Gero3D account.
After entering the email, press the “Send Code” button. A verification code will be sent to the provided email address.
Verification Code:
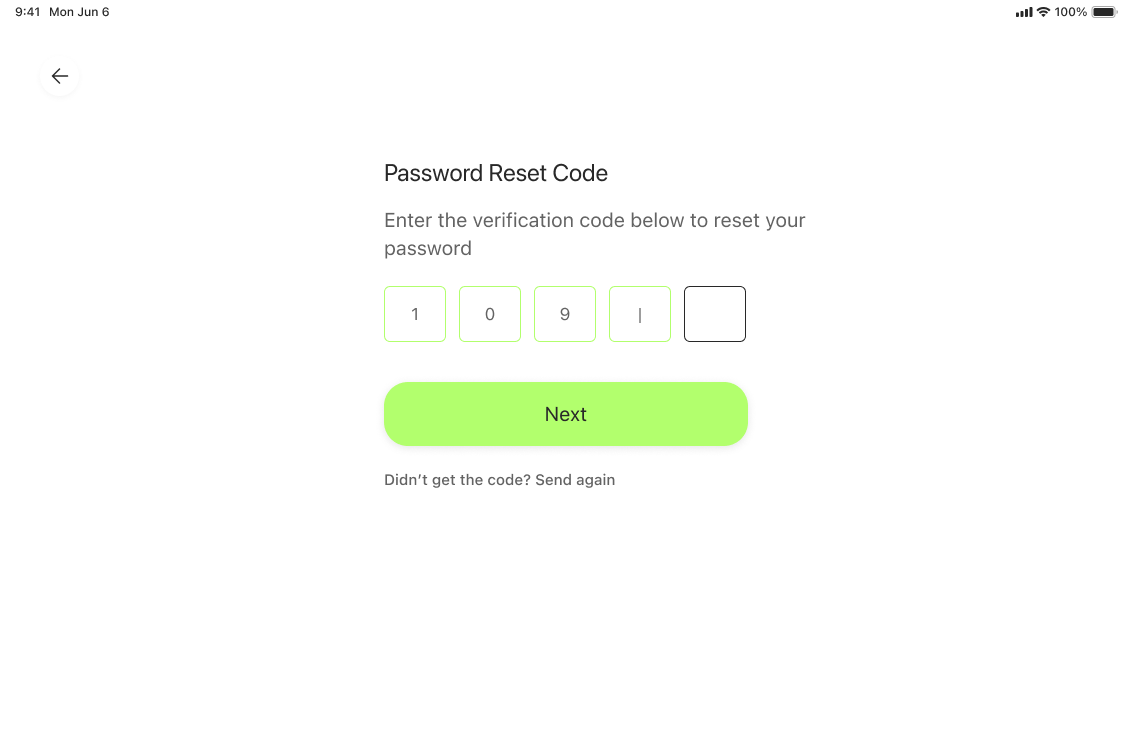
Retrieve the code from your email inbox. This code is necessary for the next step in the verification process.
Enter the verification code on the screen provided in the app to verify your identity.
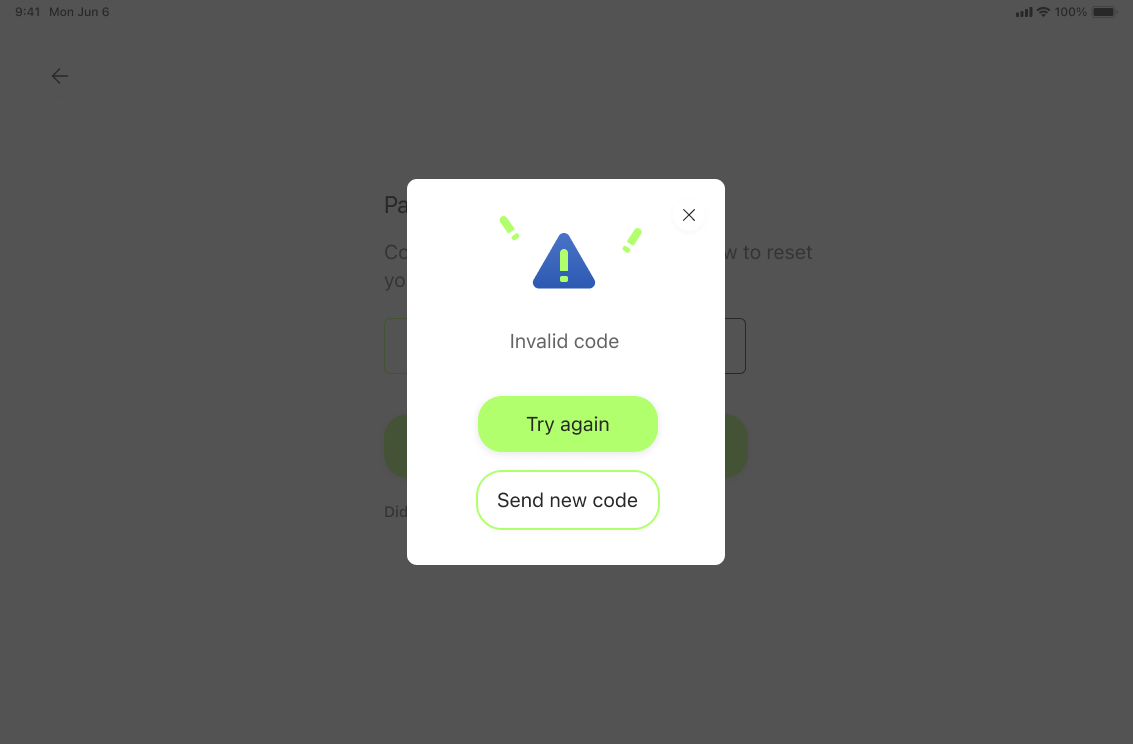
In the event that an incorrect code is entered, an appropriate pop-up message will be displayed.
Setting a New Password:
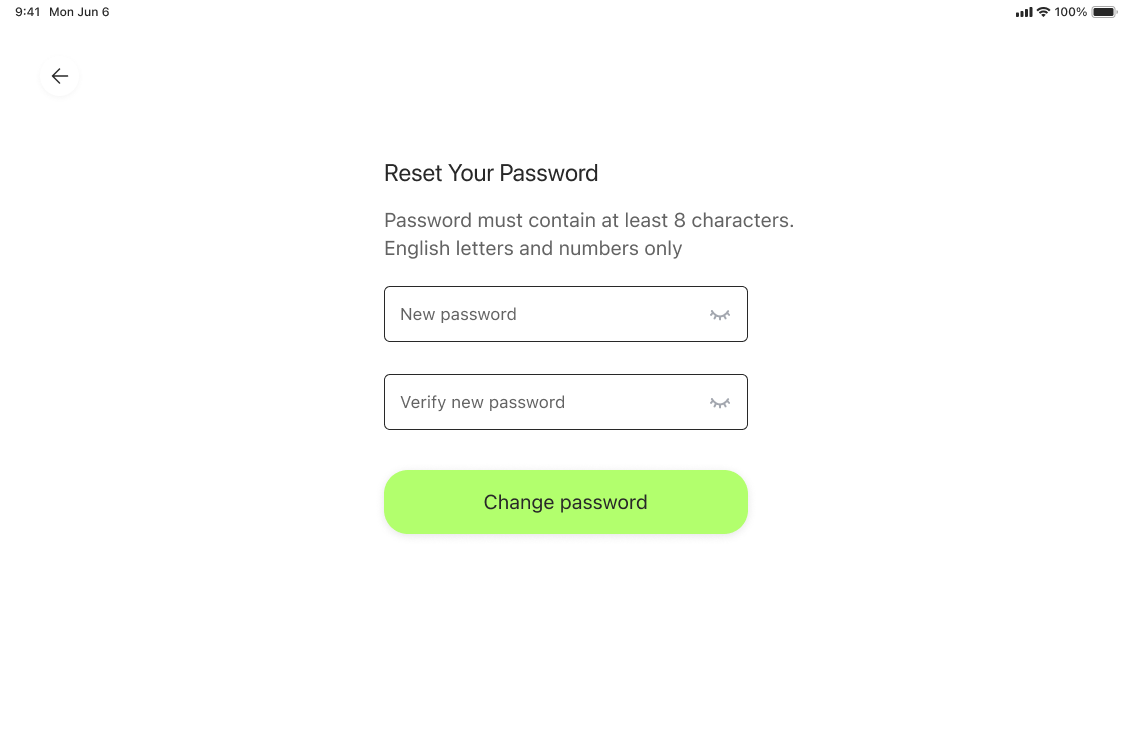
Once the code is verified, the user will be directed to a new screen to choose a new password.
It’s important to select a strong and memorable password to ensure the security of your account.
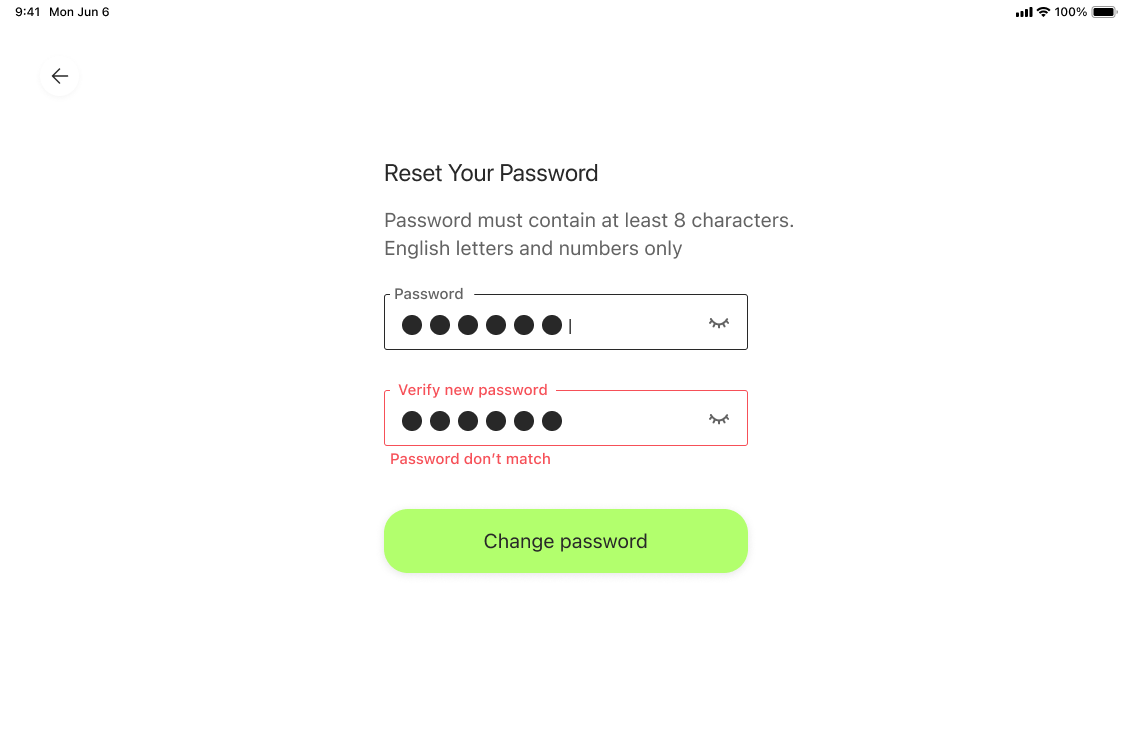
In the event that the passwords don’t match, an appropriate message will be displayed.
Completing the Reset Process:
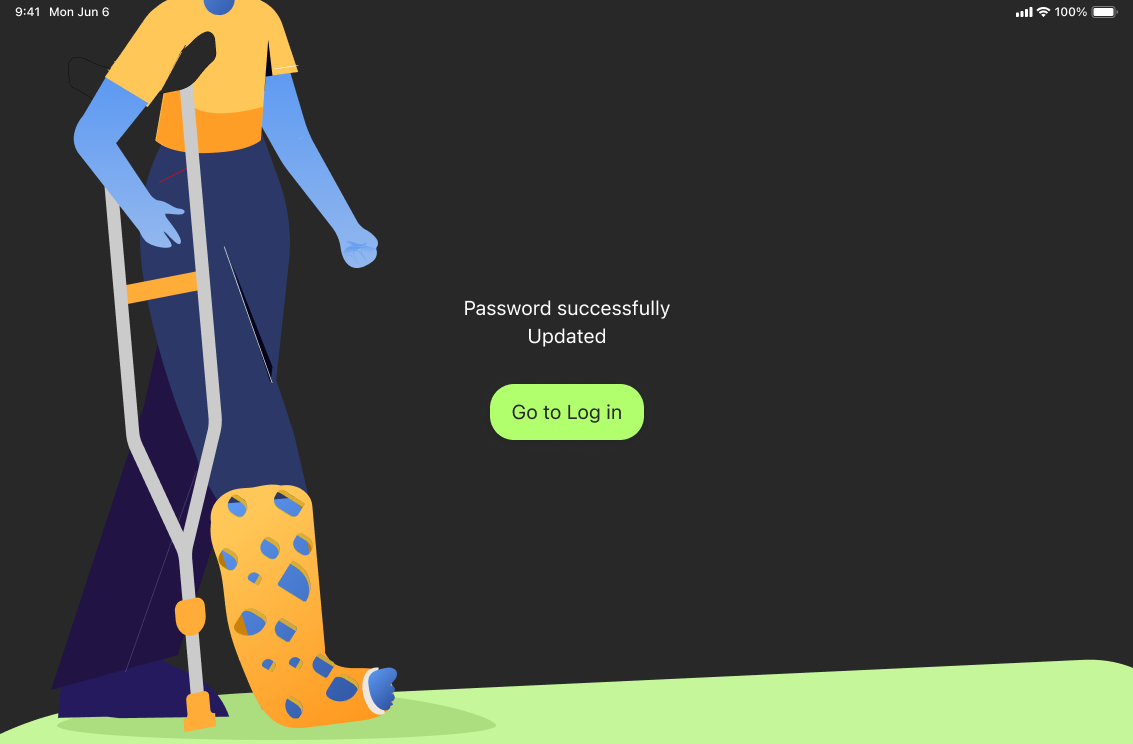
After setting the new password, pressing the “Go to Login” will redirect to the login screen.
The therapist can now use their new password to log into the Gero3D app.
Creating a New Cast Order
Starting a New Order: Steps for initiating a new cast order.
4.1 Initiating a New Order
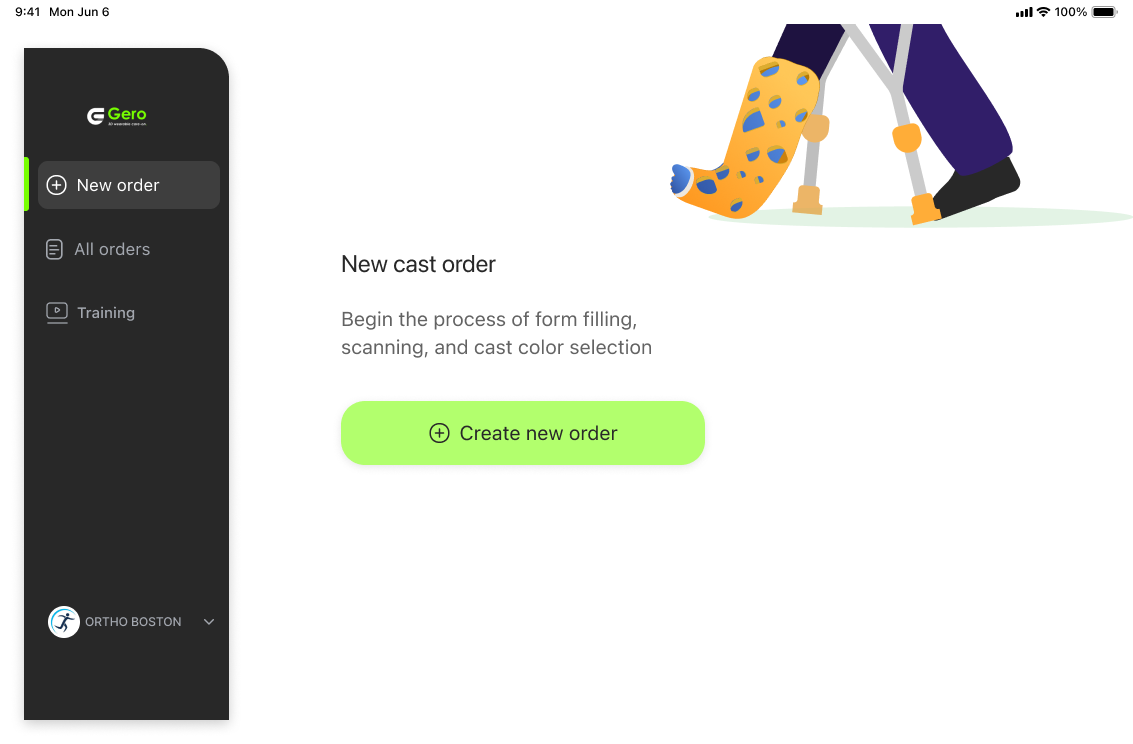
Starting the Process: To begin creating a new order, select the “Create New Order” button from the main menu.
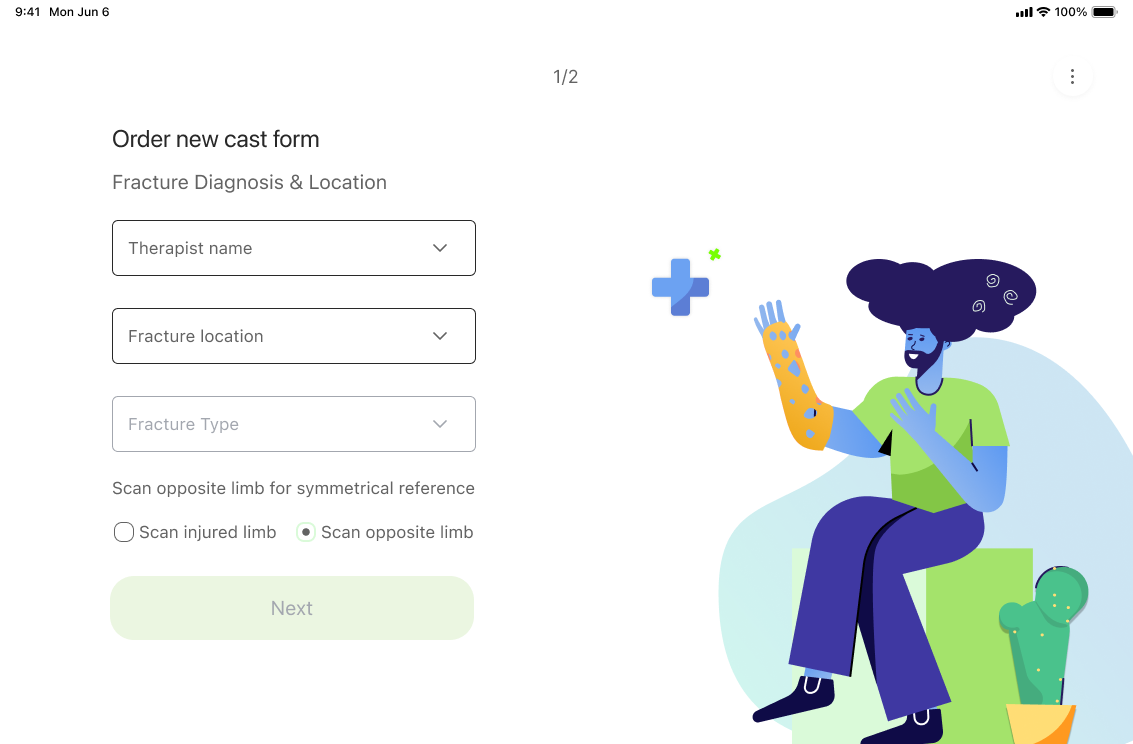
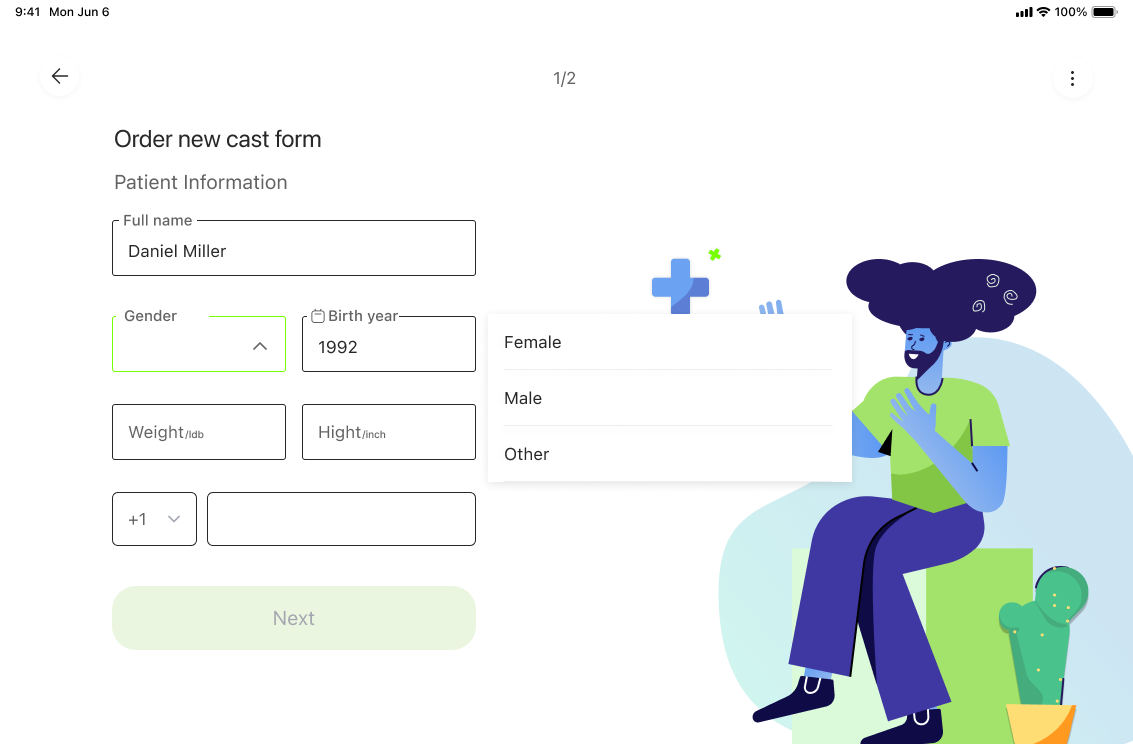
Entering Patient Information: Follow the on-screen prompts to input details such as therapist name, patient’s personal information, and specifics about the fracture.
4.2 Option to Exit

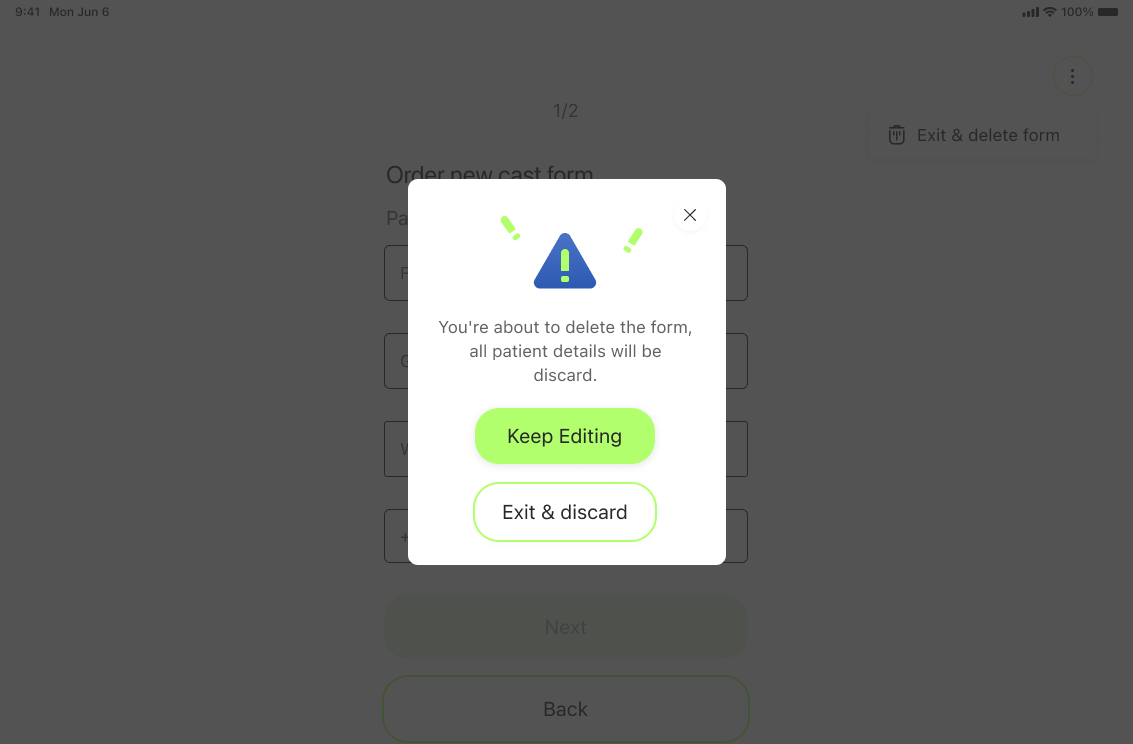
If you need to exit during this process, tap the three dots in the upper right corner of the screen and choose “Exit and Delete Form.” A warning pop-up will appear to confirm that all entered details will be discarded. Confirming this will return you to the main menu.
4.3 Scanning Tutorial or Proceed to Scan
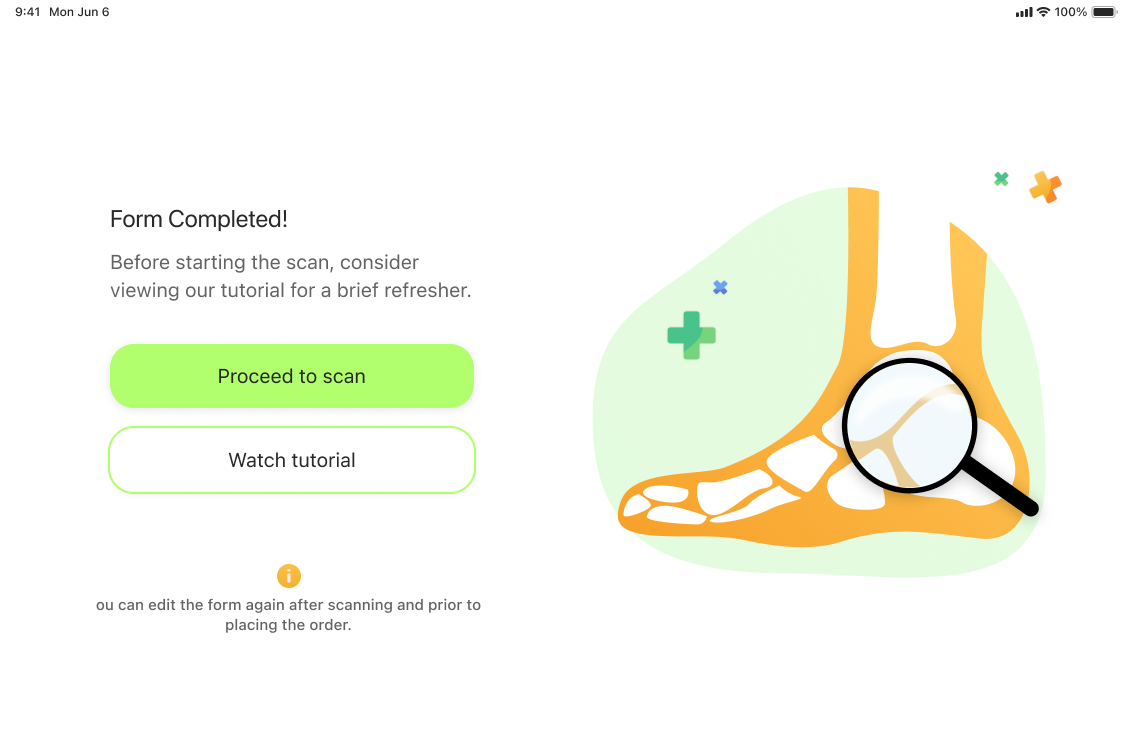
After filling in all necessary details, you’ll be presented with two options: watch a scanning tutorial for guidance or proceed directly to the scanning process.
4.4 Scanning Process

Positioning for Scan: Aim the camera at the patient’s extremity and adjust for the appearance of an AR 3D box on the screen.
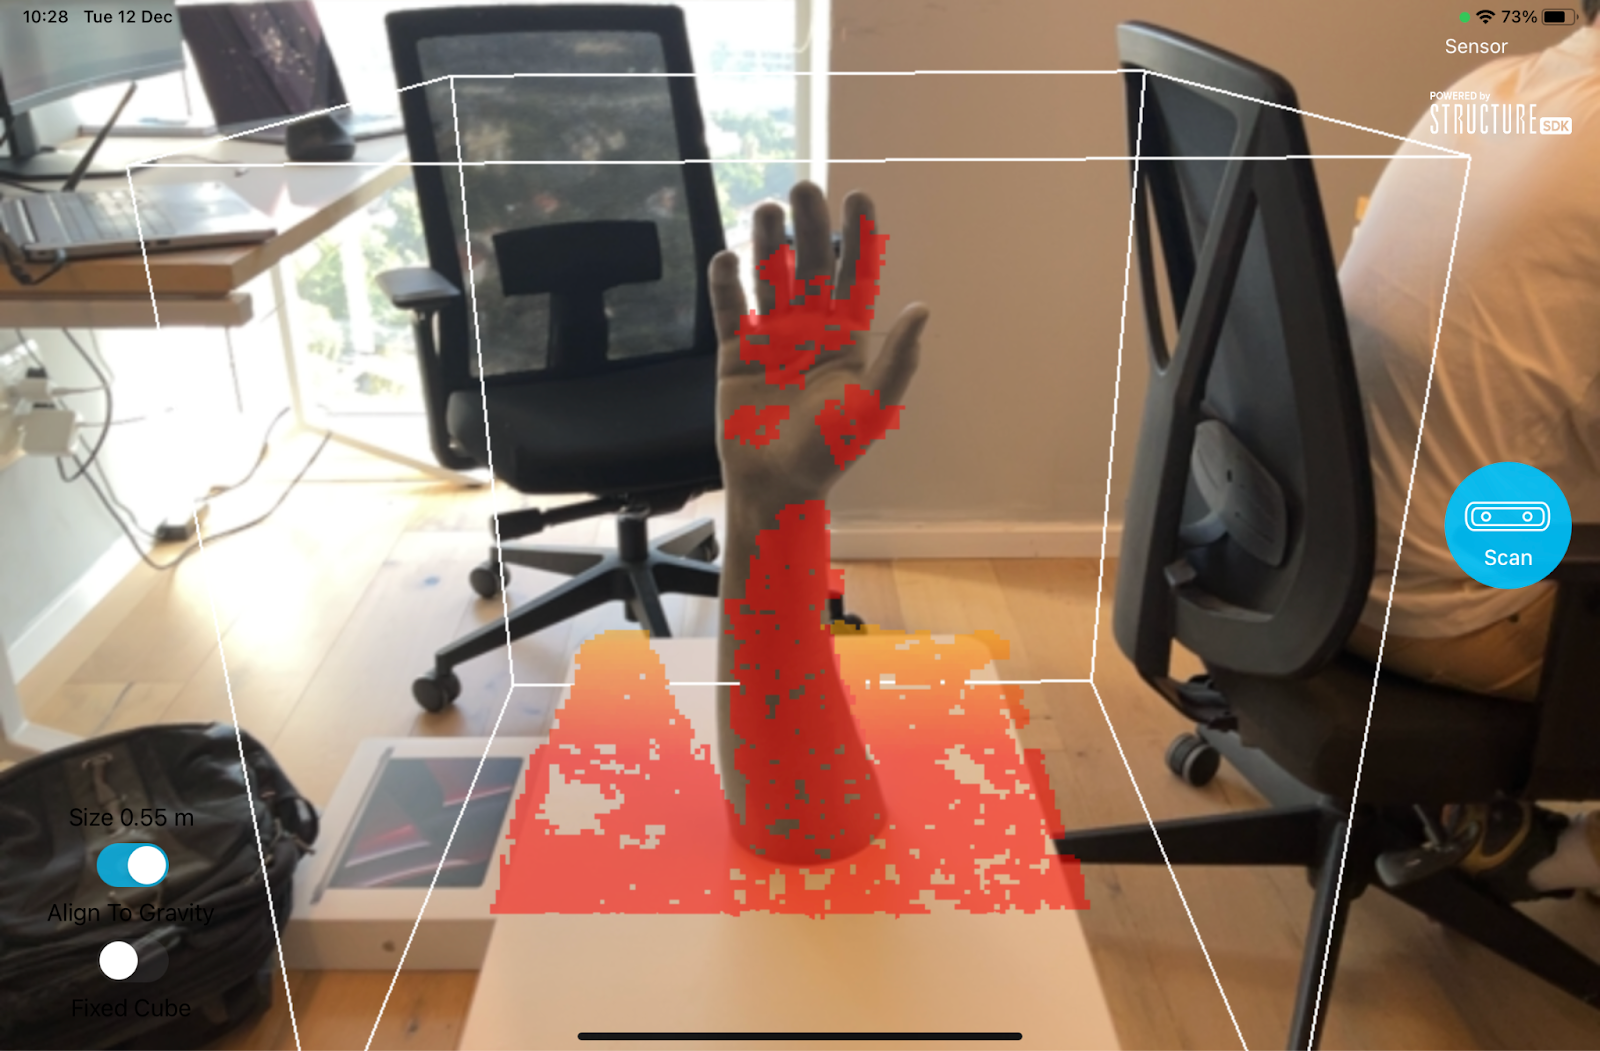
Adjusting the AR 3D Box: Resize the box to encompass the extremity using a two-finger gesture.
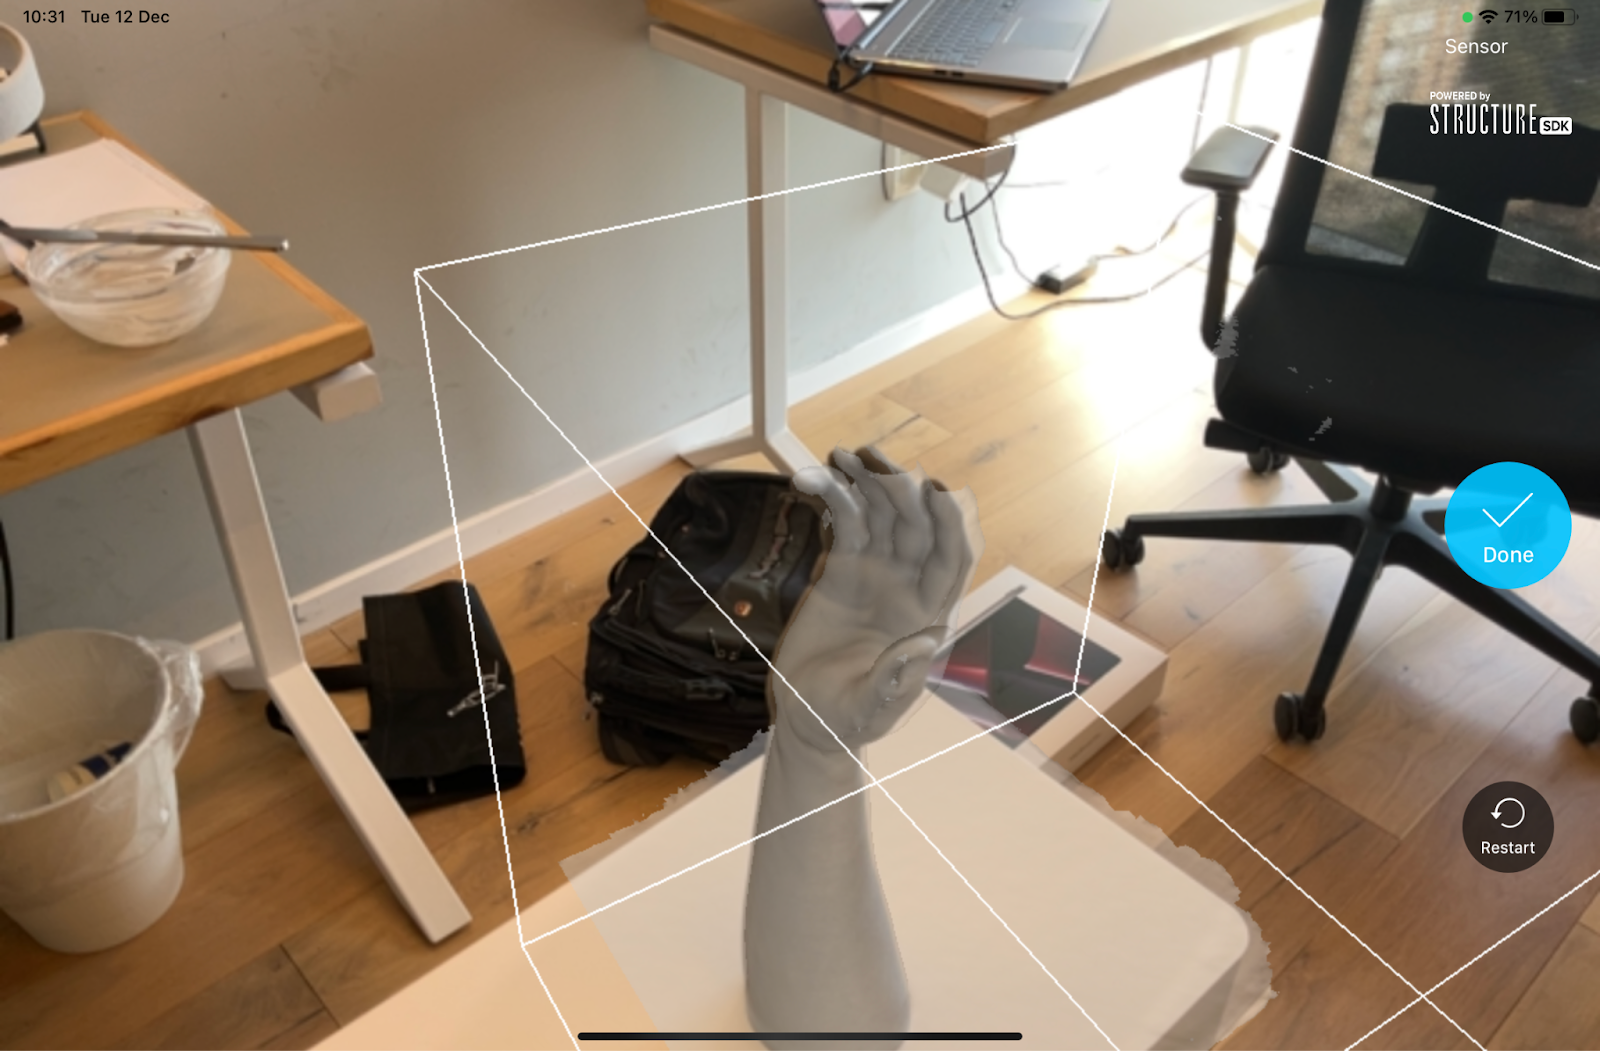
Initiating the Scan: Press the ‘Scan’ button and begin moving around the object. The object will gradually fill with white color.
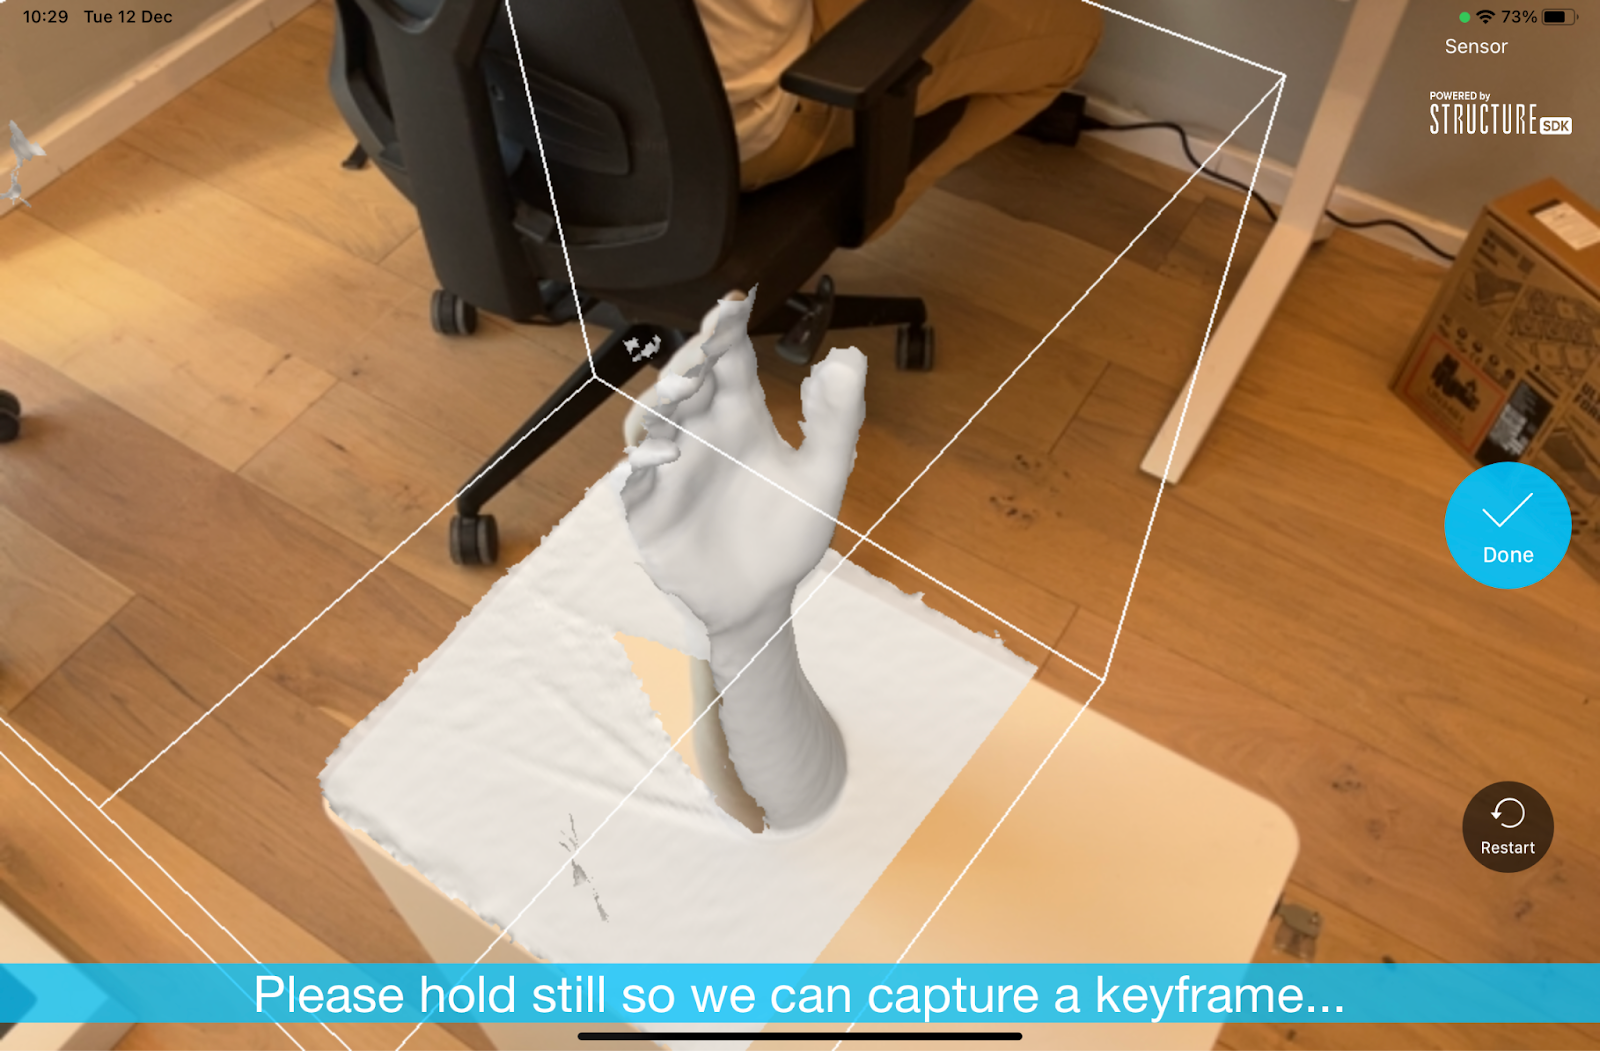
Pay attention to on-screen messages:
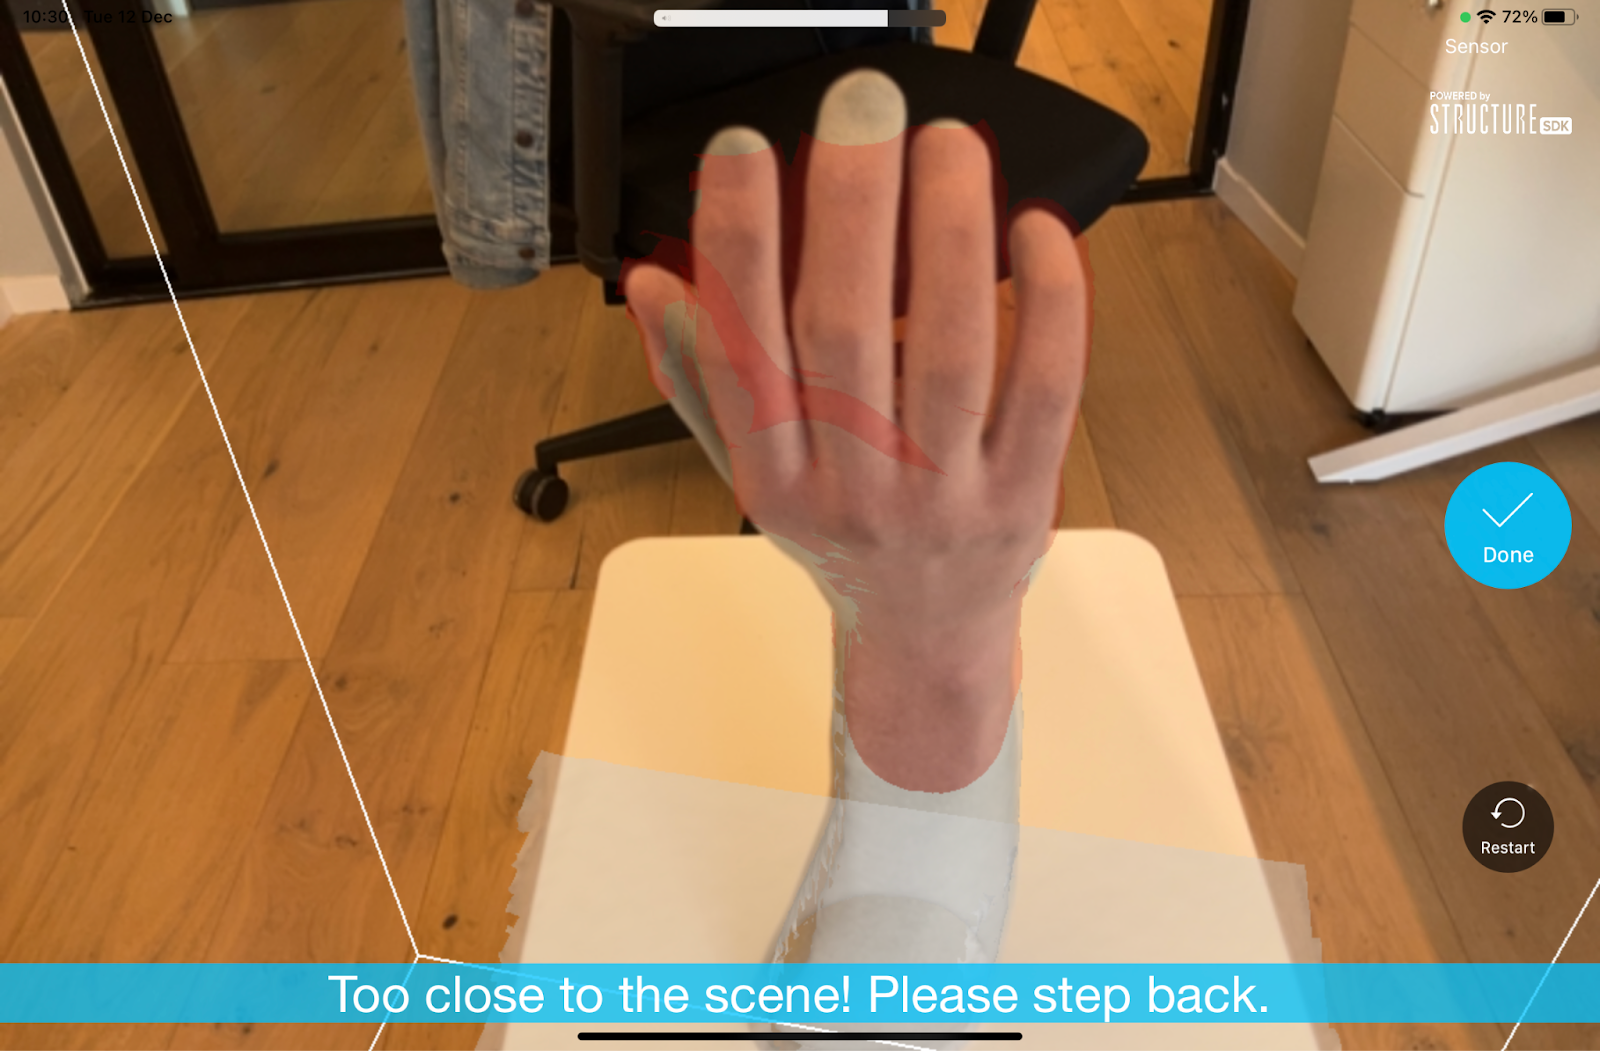
If “too close to the scene” appears, move slightly away from the object.
If “Please hold still so we can capture a keyframe” appears, hold the scanner steady until the message disappears.
Handling Lost Tracking: If tracking is lost and the object turns transparent white, adjust the camera angle until the object returns to solid white.
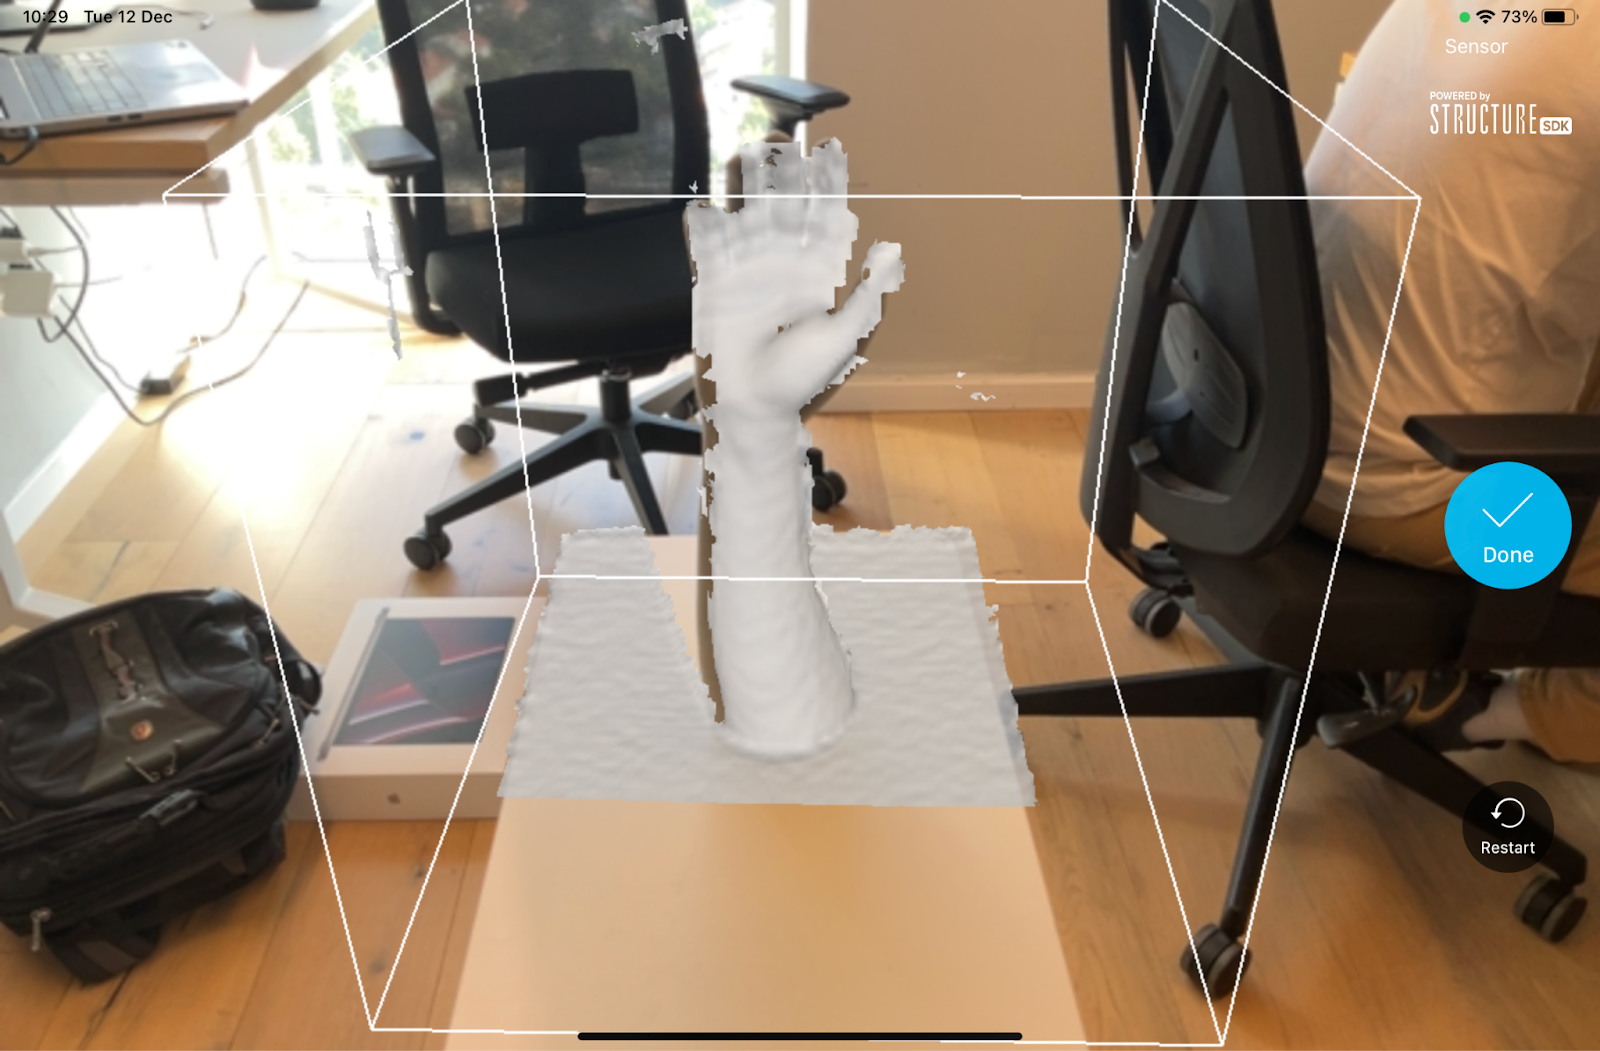
Completing the Scan: Once the object is fully covered in white, press the ‘Done’ button.
4.5 Tips for Optimal Scanning Results
Preparation
Space Requirement: Ensure the patient is positioned in an open area with at least a 1-meter clear radius around them. This space is necessary for unobstructed movement during the scanning process.
Lighting Conditions
Uniform Lighting: Choose a room with good, even lighting. It’s crucial to avoid direct sunlight or shadows, as they can affect the accuracy of the scan. Uniform lighting helps in capturing the intricacies of the scanned area more precisely.
Scanner Handling
Using Scanner Handles: For better stabilization and control, hold the scanner using its designated handles. This allows for smoother movement and more accurate data capture.
Patient Positioning
Optimal Placement: Position the patient so that the area to be scanned is easily accessible. Ensure you can physically move around the target area without any disturbances or obstructions.
Troubleshooting and Common Issues
Losing Tracking: If tracking is lost during scanning, aim the camera so that the entire object is in the middle of the screen. This reorientation often helps in regaining tracking. For more detailed information, refer to section 4.4.
Scanner Connectivity: If the app does not recognize the scanner, verify that the scanner is properly connected to the iPad via a USB Type-C cable.
Reflections and Translucent Objects: Avoid scanning surfaces that are highly reflective or translucent, as these can cause inaccuracies in the 3D model.
Movement: Ensure that the patient remains as still as possible during the scanning process. Movement can cause blurring and inaccuracies.
Best Practices
Consistent Scanning Distance: Maintain a consistent distance between the scanner and the object. The ideal range is usually between 0.5 to 2 meters.
Gradual Movement: Move the scanner slowly and steadily around the object. Rapid or jerky movements can disrupt the scanning process.
Complete Coverage: Make sure to cover every angle of the scanned area to ensure a complete and accurate 3D model.
Regular Calibration: Regularly calibrate your scanner as per the manufacturer’s guidelines to ensure optimal performance.
4.6 Reviewing the Scan
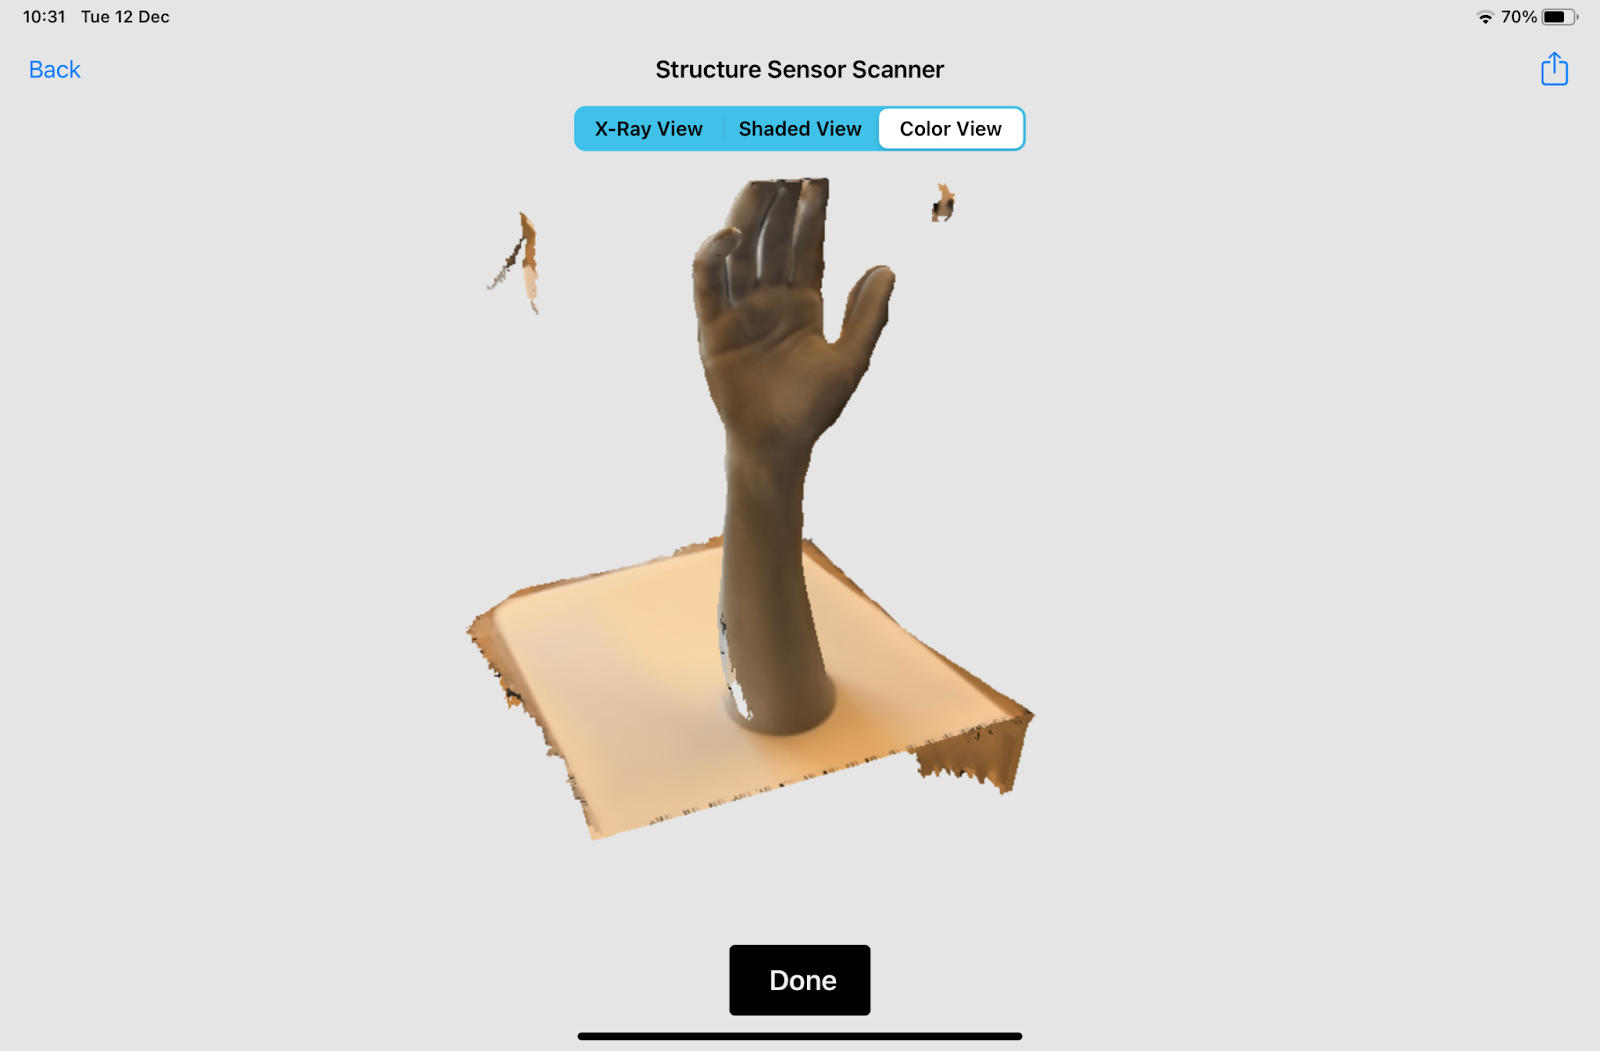
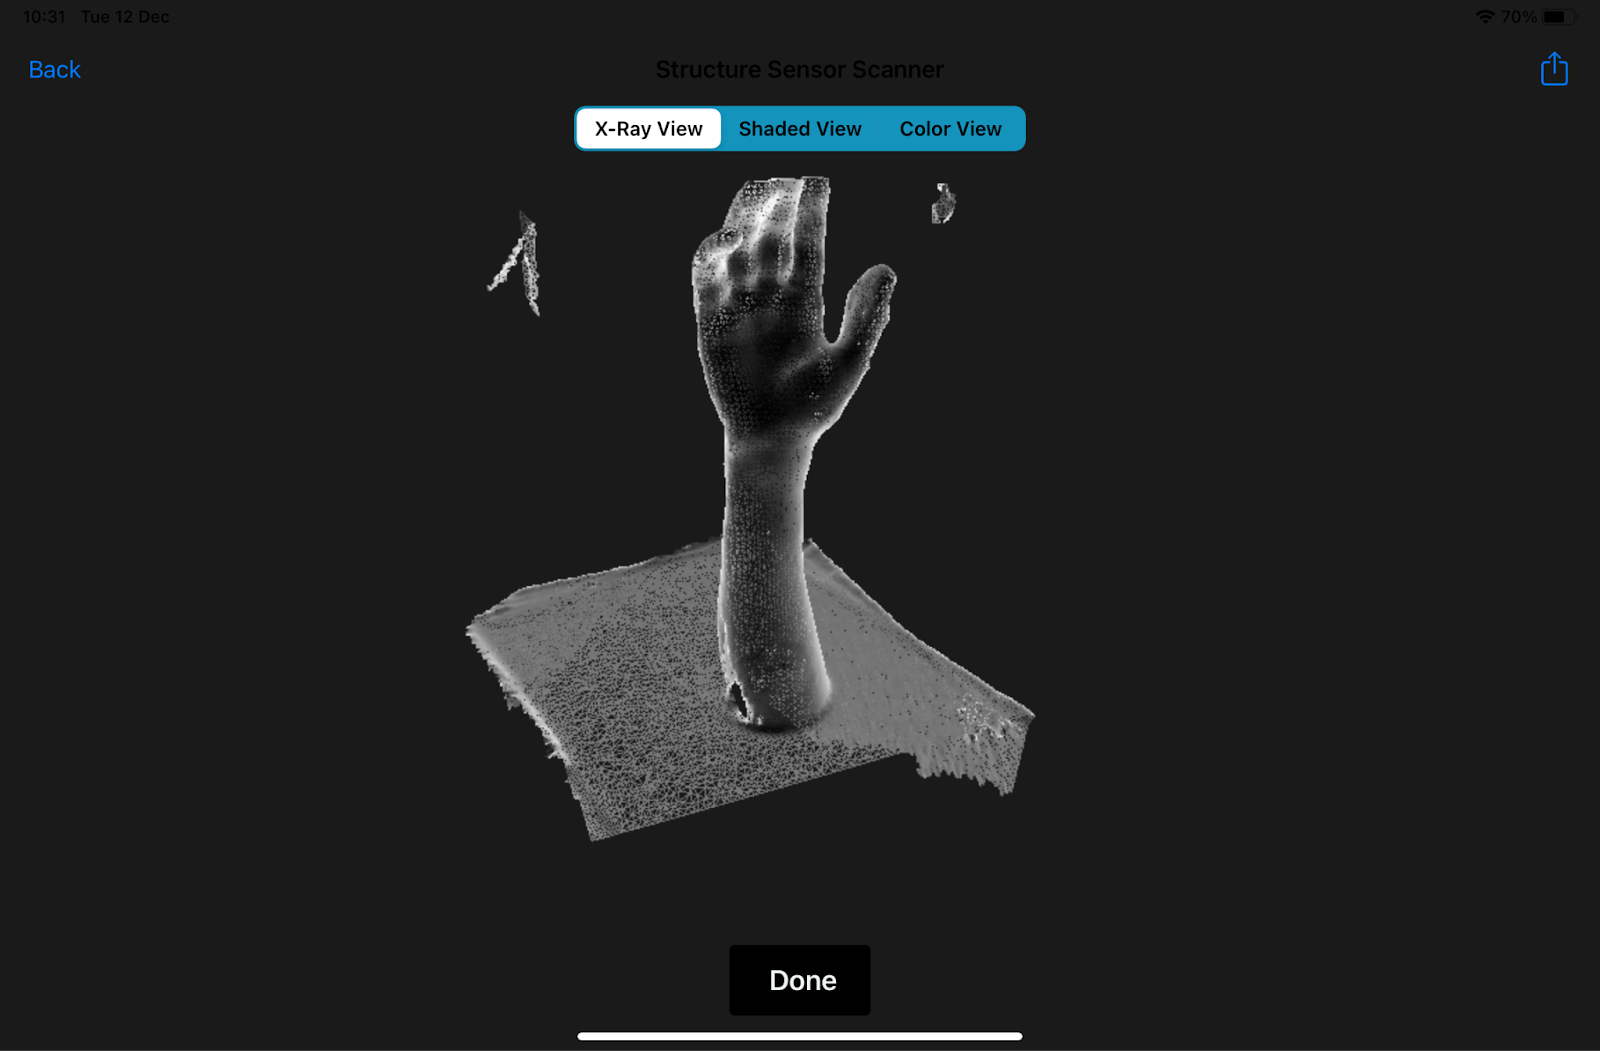
Manipulating the Scan: On the next screen, you can manipulate the scan by moving, rotating (with one finger), and zooming in or out (with two fingers).
View Options: Toggle between X-ray, standard, and color views for a better assessment.
Approving or Rescanning: Choose to approve the scan or redo it by selecting the appropriate option.
4.7 Choosing Cast Design and Color
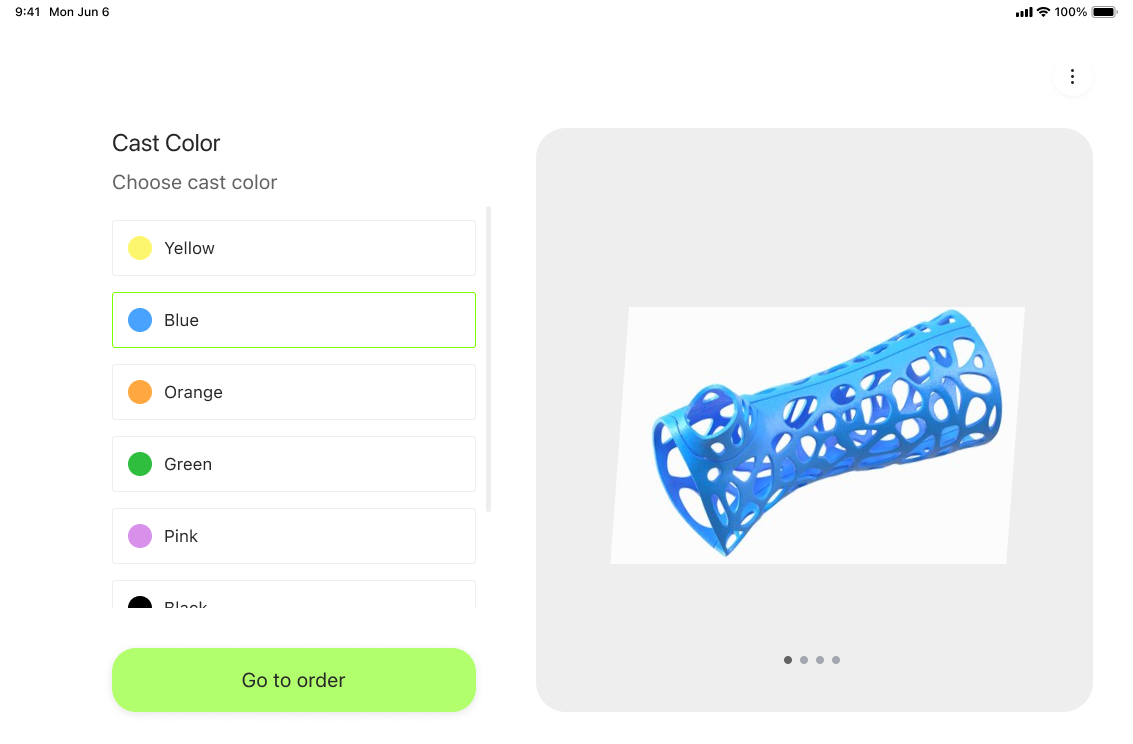
Select the design and color for the cast in the following screen.
4.8 Order Summary and Submission
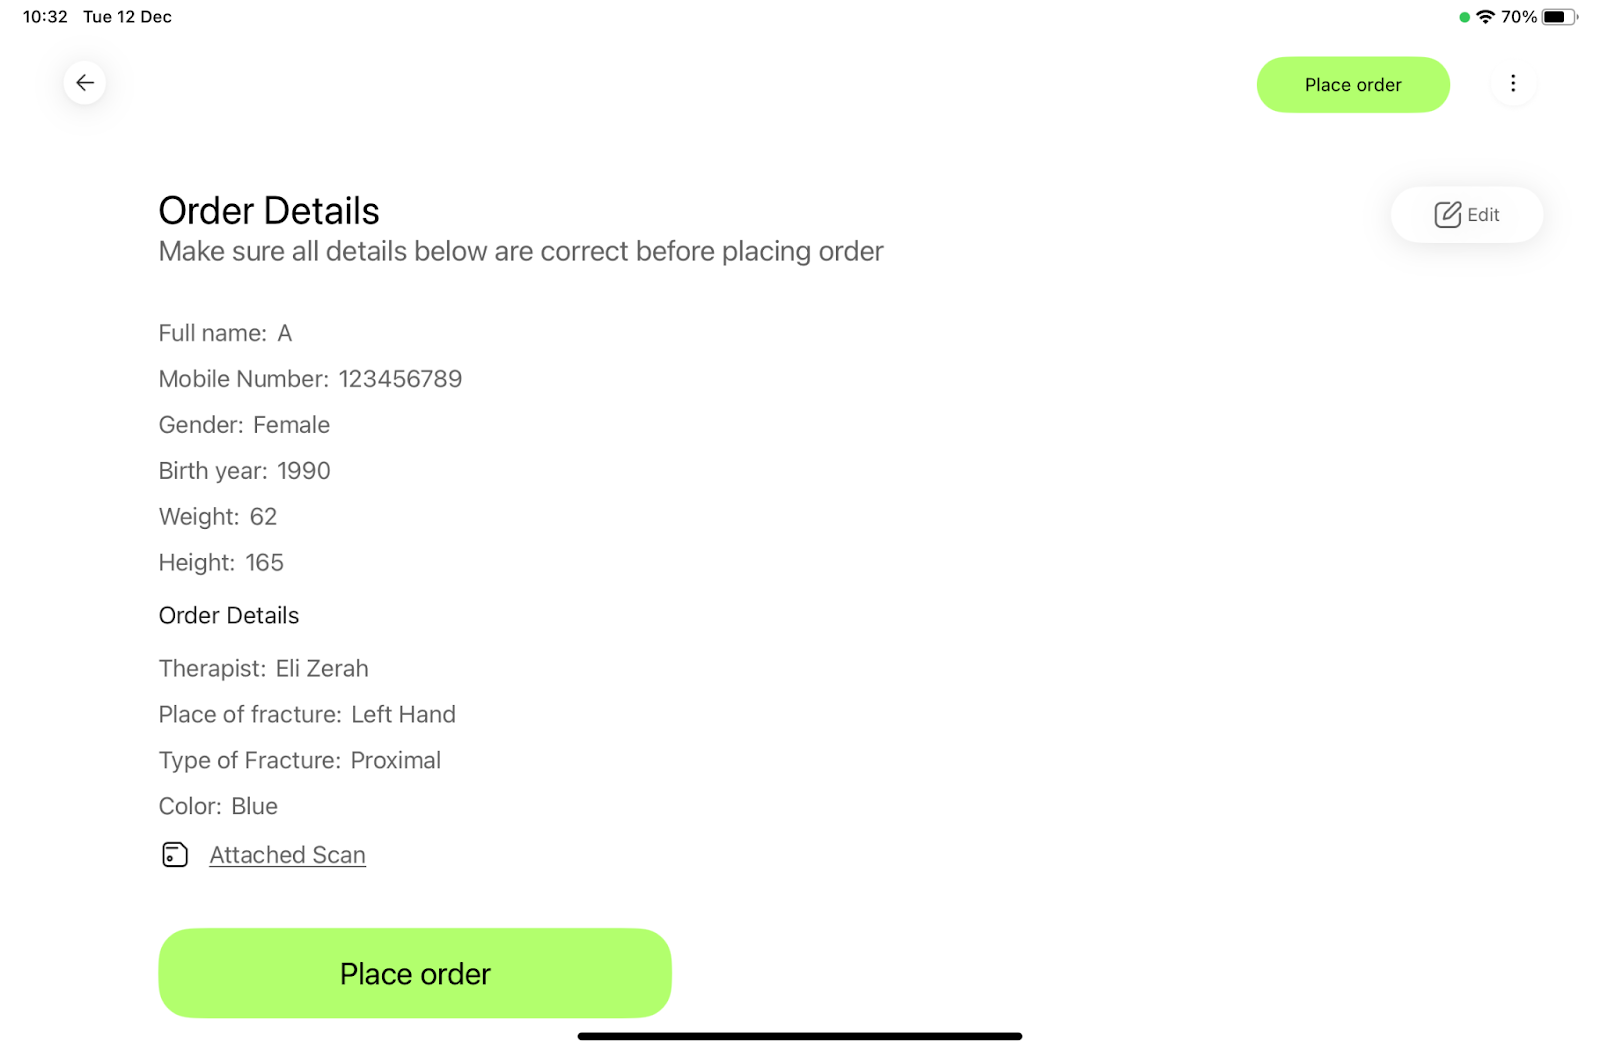
Reviewing Order Details: The next screen provides a summary of your order. You can edit patient and order details by pressing the ‘Edit’ button.
Placing the Order: To finalize and submit the order, press the ‘Place Order’ button.
Confirmation Message: Once the order is successfully sent, a confirmation message will appear on the screen.
Order List
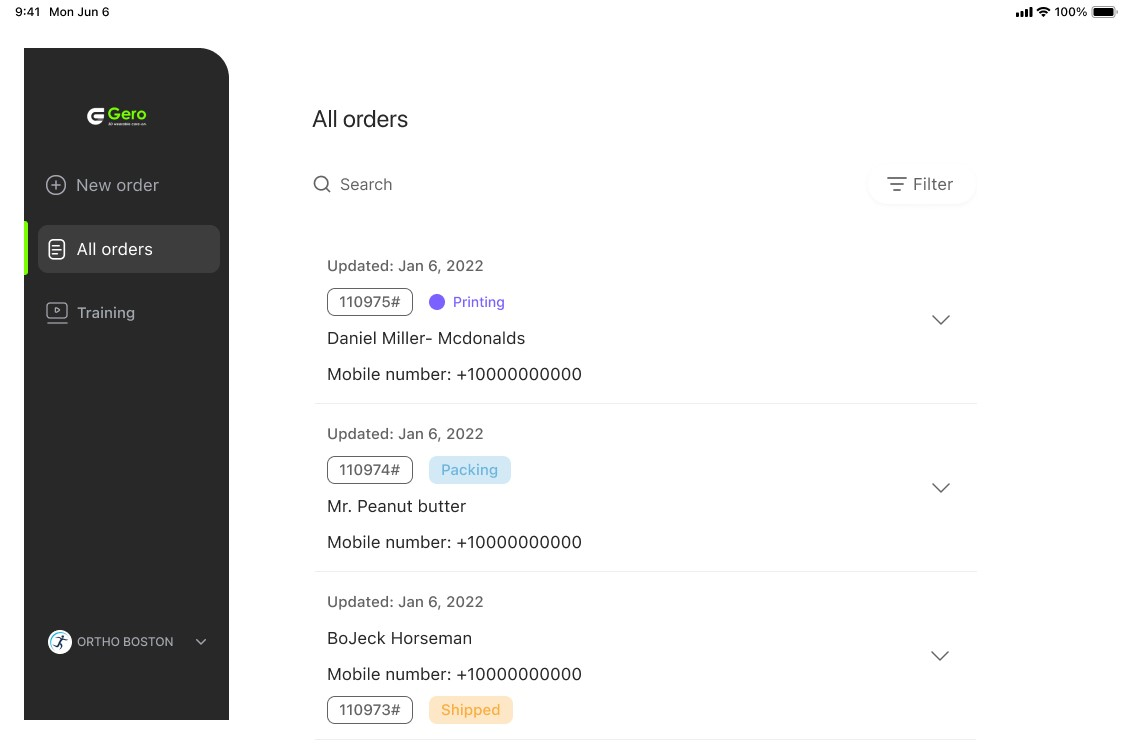
Navigating the Order List: Viewing past orders and their statuses.
Filtering and Searching:
Training Materials
Accessing Training Materials: How to use the training tab for refreshers on app usage and scanning techniques.
Maintenance and Troubleshooting
Maintenance Tips
Device Care: Regularly clean and inspect both the iPad and the external sensor. Ensure they are stored in a safe, dry place when not in use.
Software Updates: Keep the Gero3D app updated to the latest version to ensure optimal performance and access to new features.
Sensor Check: Frequently check the connection of the external sensor to the iPad, ensuring it’s securely connected via the USB Type-C port.
Battery Management: Keep the iPad charged, and if the sensor has a battery, ensure it’s charged or replaced as needed.
Troubleshooting Common Issues
App Not Responding: If the app becomes unresponsive, try restarting the iPad. If the issue persists, contact Gero3D support.
Scanner Connectivity Issues: If the scanner is not being detected, check the USB Type-C connection and ensure the scanner is turned on. Restarting the app can also help.
Scanning Accuracy Problems: If scan results are consistently poor, ensure the scanning environment adheres to the optimal conditions outlined in the manual (lighting, space, etc.). Re-calibrate the scanner if necessary.
Login Problems: For issues related to logging in or password errors, follow the reset procedure or contact Gero3D support for assistance.
For further assistance, you can contact our support team at support@gero3d.com.
FAQs
How can I customize the design and color of the cast?
After completing the scanning process, you will be directed to a screen where you can choose the cast’s color and design.
What should I do if the scanning process loses tracking of the object?
Re-aim the camera to center the object on the screen. Move the scanner slowly to regain tracking. For more detailed guidance, refer to the scanning section of the manual.
How do I add a new therapist to the app at our clinic?
To add a new therapist, send an email with their details to support@gero3d.com. Gero3D will create the user account and send the login information to the provided email.
Can I edit patient details after creating an order?
Yes, you can edit patient details at the order summary screen before finalizing the order.
What if I forget my login password?
Use the “Forgot Password” function on the login screen to reset your password. A verification code will be sent to your email to facilitate this process.
How often should I update the Gero3D app?
It’s recommended to update the app whenever a new update is available. Regular updates ensure you have the latest features and security enhancements. If an essential update is required, the system will notify you that an update must be completed for the app to continue functioning optimally. This notification is designed to ensure that your app remains up-to-date with the latest advancements and security features.
Is there a way to view past orders?
Yes, you can view all past orders and their statuses in the Order List Table. The list can be sorted and searched by order number or patient name.
What happens if the app crashes during an order?
If the app crashes, reopen it and check the Order List Table. If the order was not saved, you may need to re-enter the information. Ensure the iPad’s software is up-to-date to minimize app crashes.
Is it possible to cancel or modify an order after submission?
Once an order is submitted, it’s immediately processed for production. To modify or cancel an order, contact Gero3D support as soon as possible with the order details.
How can I provide feedback on the app?
Feedback is crucial for us to continuously improve the app. To leave feedback directly through the app, please open an issue from within the app and write “Feedback” in the title. This will ensure that your feedback is recognized and addressed appropriately. You can also provide feedback by contacting Gero3D support directly. We greatly appreciate your insights and suggestions.
Appendices (TBD)
Appendix A: Technical Specifications
Device Compatibility: Detailed specifications about the types of iPads and sensors compatible with the Gero3D app.
Software Requirements: Information on the operating system and any additional software requirements for the app.
Scanner Specifications: Detailed information about the external sensor, including model, technical specifications, and maintenance tips.
Appendix B: Legal and Compliance Information
Privacy Policy: Adheres to HIPAA standards for data protection and privacy. Patient and therapist data is encrypted and securely stored.
Terms of Use: Includes acceptable use policy, intellectual property rights, and disclaimers of liability.
Compliance Certifications: Certified for medical use under ISO 13485 and complies with FDA regulations.
Appendix C: Calibration and Maintenance Procedures
Calibration: Monthly calibration of the sensor is recommended, following the manufacturer’s instructions.
Maintenance: Regular cleaning of the iPad screen and sensor lens. Check for software updates monthly.
Appendix E: Contact Information
Support Email: support@gero3d.com
Appendix H: Update Log
A log of past updates to the app, detailing changes, improvements, and bug fixes in each version.
Appendix I: Feedback Submission Guidelines
Submitting Feedback: Access the issue reporting feature within the app, use “Feedback” as the title.
Direct Communication: Details on how to communicate feedback directly via email.